Battery switch on travel trailer function is crucial for managing your RV’s power. Understanding how to use your battery switch correctly ensures safe and efficient power distribution between your house batteries (powering appliances) and your chassis battery (powering starting systems). This guide covers various switch types, their operation, troubleshooting, and maintenance, helping you keep your travel trailer running smoothly.
We’ll explore different battery switch types, from simple single-pole switches to more complex double-pole double-throw (DPDT) switches, outlining their advantages and disadvantages. Learn the proper procedures for connecting and disconnecting batteries, crucial safety precautions, and how to troubleshoot common problems. We’ll also cover the integration of your battery switch with solar panels for optimal power management on the road.
Battery Switch Maintenance and Upkeep
Keeping your travel trailer’s battery switch in good working order is crucial for reliable power. Regular maintenance prevents problems and ensures a long lifespan for both the switch and your batteries. Neglecting this simple task can lead to corrosion, poor connections, and even battery failure.Regular maintenance of your battery switch involves a straightforward process that should be performed at least twice a year, or more frequently if you live in a humid climate or experience harsh weather conditions.
This routine check will significantly extend the life of your battery system and prevent costly repairs down the line.
Battery Switch Maintenance Schedule
A recommended schedule includes visual inspections and cleaning every three months, and a more thorough inspection and cleaning at least twice a year, preferably before and after the main camping season. This more thorough cleaning should include checking all connections for tightness and signs of wear. You should also consider testing your battery’s voltage regularly to ensure optimal performance.
A significant drop in voltage might indicate a problem with the switch or wiring.
Inspecting for Corrosion and Cleaning Terminals
Corrosion on battery terminals and the switch itself is a common problem that can severely restrict current flow. Look for white, green, or blue powdery deposits on the terminals and the switch itself. These deposits act as insulators, preventing proper electrical contact and leading to reduced battery performance and even overheating. Regular cleaning removes these deposits, ensuring a clean and efficient connection.
Severe corrosion might require the use of a wire brush or terminal cleaner to completely remove the build-up.
Tools and Materials for Battery Switch Maintenance
To perform regular battery switch maintenance, you will need a few basic tools and materials. Having these items readily available will make the process quick and efficient.
- Wire brush (brass or nylon)
- Baking soda
- Water
- Spray bottle
- Cloth or rags
- Safety glasses
- Gloves (rubber or nitrile)
- Battery terminal cleaner (optional, but recommended)
- Wrench (appropriate size for your battery terminals)
Remember to always disconnect the negative (-) battery terminal first before performing any maintenance on the battery switch or its associated wiring. This is a crucial safety precaution to prevent accidental short circuits and potential injury.
Battery Switch and Solar Panel Integration

Your travel trailer’s battery switch plays a crucial role in managing power, especially when you add solar panels to your setup. Understanding their interaction is key to maximizing your solar charging efficiency and ensuring your batteries are properly protected. This section explains how the switch affects solar charging and guides you through proper system configuration.Solar panel charging systems work by converting sunlight into DC electricity, which then needs to be directed to your batteries for storage.
So, you’re planning a trip? Awesome! Don’t forget travel insurance! Check out this resource for details on Aon travel insurance to get a good overview of their plans. Comparing options is key, so after that, maybe take a look at Aon travel insurance to see if their offerings fit your needs better.
Remember to read the fine print carefully before committing to any policy! Happy travels!
The battery switch acts as a gatekeeper, controlling the flow of power to and from your batteries. The position of this switch directly impacts how efficiently your solar panels can charge your batteries.
Solar Panel Charging and Battery Switch Positions, Battery switch on travel trailer function
The impact of the battery switch position on solar charging is straightforward. With the switch in the “ON” position, the solar charge controller will have a direct path to charge the batteries. In the “OFF” position, however, the switch breaks this connection, preventing any charging from the solar panels. Even if your solar panels are producing power, that power won’t reach your batteries while the switch is “OFF.” This is a crucial safety feature; however, it also highlights the importance of correct switch operation when using solar power.
Improper switch settings can lead to undercharged batteries or, in some cases, damage to the solar charging system itself.
Correct System Configuration with Battery Switch and Solar Panels
Properly integrating a battery switch and solar panels requires a few key considerations. First, the solar charge controller should be wired to the battery side of the switch. This ensures that the solar panels can only charge the batteries when the switch is in the “ON” position. This setup allows you to disconnect your house batteries from the rest of the trailer’s electrical system without affecting the solar charging process.
So, you’re planning a trip? Awesome! Don’t forget travel insurance! Check out this resource for info on Aon travel insurance – they often have great deals. Seriously, it’s worth looking into different providers, and comparing their policies. Then, once you’ve got a few options, you can head over to Aon travel insurance to see what they offer.
Getting insured before you leave is a smart move; you’ll sleep better knowing you’re covered!
Imagine a scenario where you’re leaving your trailer for an extended period: Switching the batteries “OFF” protects against parasitic drain from lights or appliances left unintentionally on, while the solar panels continue to keep your batteries topped off.Secondly, it’s important to ensure that the wiring is correctly sized to handle the current produced by your solar panels. Using undersized wiring can lead to overheating and potential fire hazards.
Always consult a qualified electrician or follow the manufacturer’s instructions when wiring your system. Finally, a properly sized fuse or circuit breaker should be installed in the solar panel circuit for additional safety and protection. This prevents damage to the solar panels and other components in the event of a short circuit or overload.
Visual Representation of Battery Switch Wiring
Understanding the wiring diagram for your travel trailer’s battery switch is crucial for safe and efficient power management. A clear picture of the setup helps in troubleshooting problems and ensures you’re getting the most out of your battery system. This section provides a detailed description of a typical wiring configuration. Remember to always consult a qualified electrician if you’re unsure about any aspect of your electrical system.This description details a common setup using a battery switch to manage power between two batteries (a main deep-cycle battery and a starting battery) and the trailer’s electrical system.
We’ll describe the components, wire sizes, and color-coding conventions often used. Note that variations exist depending on the manufacturer and specific trailer configuration.
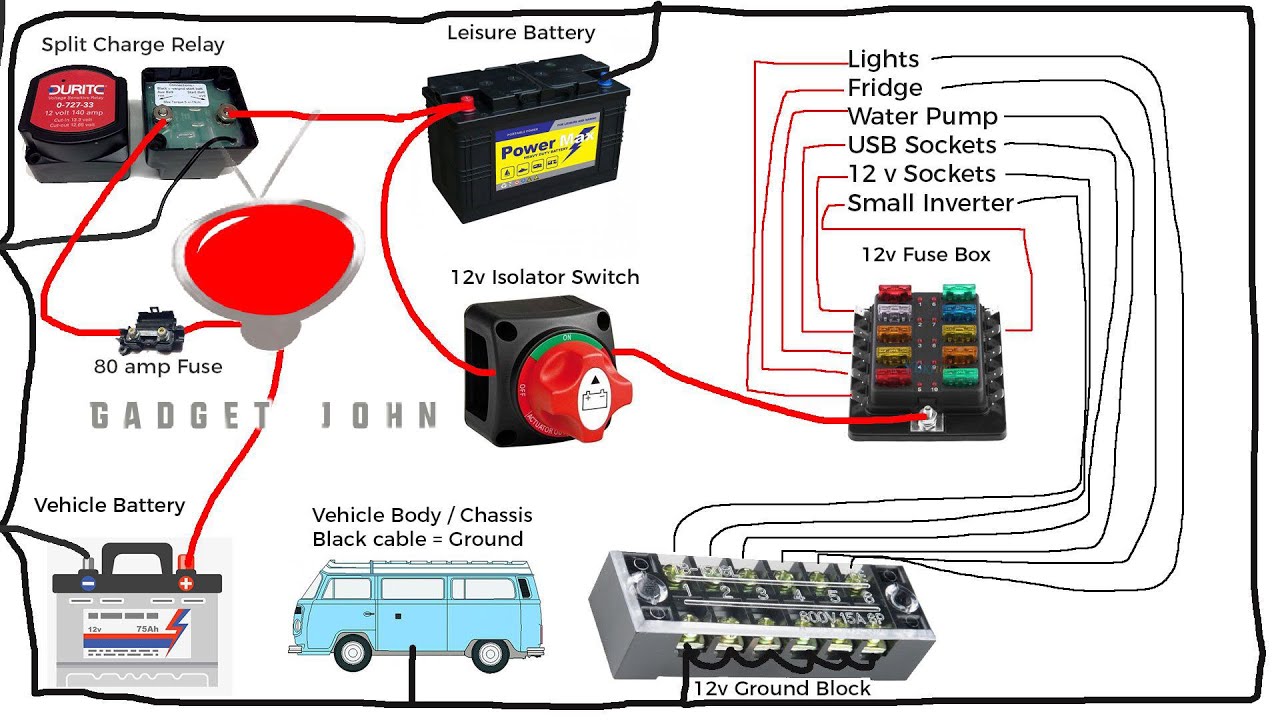
Typical Battery Switch Wiring Diagram
Imagine a box (the battery switch) with several terminals. Let’s label them for clarity: “Main Battery Positive (+)”, “Main Battery Negative (-)”, “Starting Battery Positive (+)”, “Starting Battery Negative (-)”, “Load Center Positive (+)”, and “Load Center Negative (-)”. The “Load Center” refers to the distribution point for power to the trailer’s lights, appliances, and other loads.From the positive terminal of your main deep-cycle battery (typically a large, deep-discharge battery for house power), a heavy-gauge wire (at least 4 AWG, often larger, depending on the battery’s capacity and the total load) runs to the “Main Battery Positive (+)” terminal on the battery switch.
This wire is usually red. Similarly, a matching red wire runs from the “Load Center Positive (+)” terminal on the battery switch to the positive bus bar in your trailer’s load center. The same size wire should be used.A second heavy-gauge red wire connects the starting battery’s positive terminal to the “Starting Battery Positive (+)” terminal on the switch.
This wire might be slightly thinner (e.g., 6 AWG) as the starting battery is primarily for the engine and less demanding loads.The negative sides are handled similarly. A heavy-gauge black wire (matching gauge to the positive main battery wire) runs from the “Main Battery Negative (-)” terminal on the battery switch to the negative terminal of the main deep-cycle battery.
Another black wire, from the “Starting Battery Negative (-)” terminal on the switch, connects to the starting battery’s negative terminal. Finally, a heavy-gauge black wire runs from the “Load Center Negative (-)” terminal of the battery switch to the negative bus bar of the load center.
Components and Protection
Several crucial components ensure safety and reliable operation:The Battery Switch: This is the central control point, allowing you to isolate either battery or both. The switch itself is usually a heavy-duty switch designed for the amperage of the system. Batteries: Two batteries are typically involved: a deep-cycle battery for house power and a starting battery for the tow vehicle’s engine.
Fuses and Circuit Breakers: These are vital safety devices. Fuses are usually found on individual circuits within the load center, protecting individual appliances. Circuit breakers are also common in load centers, and often a main circuit breaker protects the entire system from overloads. These prevent damage to the wiring and appliances in case of a short circuit or overload.
Load Center: This is the central distribution point for power in the trailer, with multiple circuits for different appliances and lighting. Wire Gauge: The wire gauge is crucial. Using undersized wire can lead to overheating and fire hazards. The gauge should be appropriate for the amperage draw of the connected loads. Color Coding: Consistent color-coding (red for positive, black for negative) is vital for safety and easy identification.
This simplifies troubleshooting and prevents accidental connections.
Mastering your travel trailer’s battery switch is key to a worry-free RV experience. By understanding its function, performing regular maintenance, and knowing how to troubleshoot common issues, you’ll ensure reliable power for all your appliances and avoid potentially damaging situations. Remember, safety is paramount – always disconnect batteries before performing any maintenance or repairs. Happy travels!
Helpful Answers: Battery Switch On Travel Trailer Function
What happens if I leave my battery switch in the OFF position?
Leaving the switch OFF completely disconnects both your house and chassis batteries, preventing power to appliances and preventing your engine from starting.
Can I use a battery switch with lithium batteries?
Some lithium battery systems require specific switches designed for their higher voltage and current demands. Check your lithium battery system’s manual for compatibility.
Why is my battery switch getting hot?
A hot battery switch usually indicates high current draw or a loose connection. Inspect for loose wires, corrosion, and check for overloads on your circuits.
How often should I inspect my battery switch?
Inspect your battery switch at least once a year, or more frequently if you use your RV extensively or in harsh conditions. Look for corrosion, loose connections, and any signs of damage.
